Thursday 29 October 2015

A Mermaid Legends How-to: Style your hair just like Shelley's.

Inventing and drawing the hairstyles for Coralie Sparkles' mermaids in Estella and the Falling Star was just about the most fun I've had with pencils and paper.

I love Pippa's short brown bob, and Merina's free-flowing, long-as-her-tail, shiny black tresses. I also love Estella's crinkly golden curls, with her simple little plait dangling down beside one ear.


Shelley
But it was really fun creating a more intricate hair-do for the mermaid with attitude, Shelley. She is after all, the Guardian's daughter. Her jewellery hints at her status, and so her hair had to measure up. I could imagine Shelly being used to being pampered, and perhaps having a loyal servant to arrange her hair in exciting ways each morning. I pictured her with a dressing table full of ribbons, shell decorations, jewels and beautiful silver bangles and pendants.


Darcie with Shelley's hair-do.


With two slim plaits that start at her temples and link up at the back into one high pony-tail, a ribbon is tied in and weaved down through the rest of Shelley's hair, plaited for a section, tied off, and tied again at short intervals to create a series of bulbous bobbles, before trailing off in a nice long tassle at the end. 

My friend Darcie (otherwise know as Shellanna Shimmerfin - to check out your own mermaid name, click HERE.) has been growing her hair for some time and was happy to try out Shelley's stylish plaits. We took photos at every point to make it really easy for you to follow the steps and try it for yourself. 


1. Brush hair thoroughly and part in the middle. Take a section from the front, from the parting to above the ear. Plait it until its long enough to reach past the middle of the back of the head. Put a tie around it while you do the other side.


2. Hold the two plaits out of the way while you brush the rest of the hair up into a neat, high pony-tail and secure well. Then bring the plaits round and add into the pony-tail by securing with a separate tie. This just makes it easier so you're not trying to hold onto too much while securing the pony-tail. I can tell you it was easier drawing this hairstyle than doing it with real hair that wanted to slide all over the place!


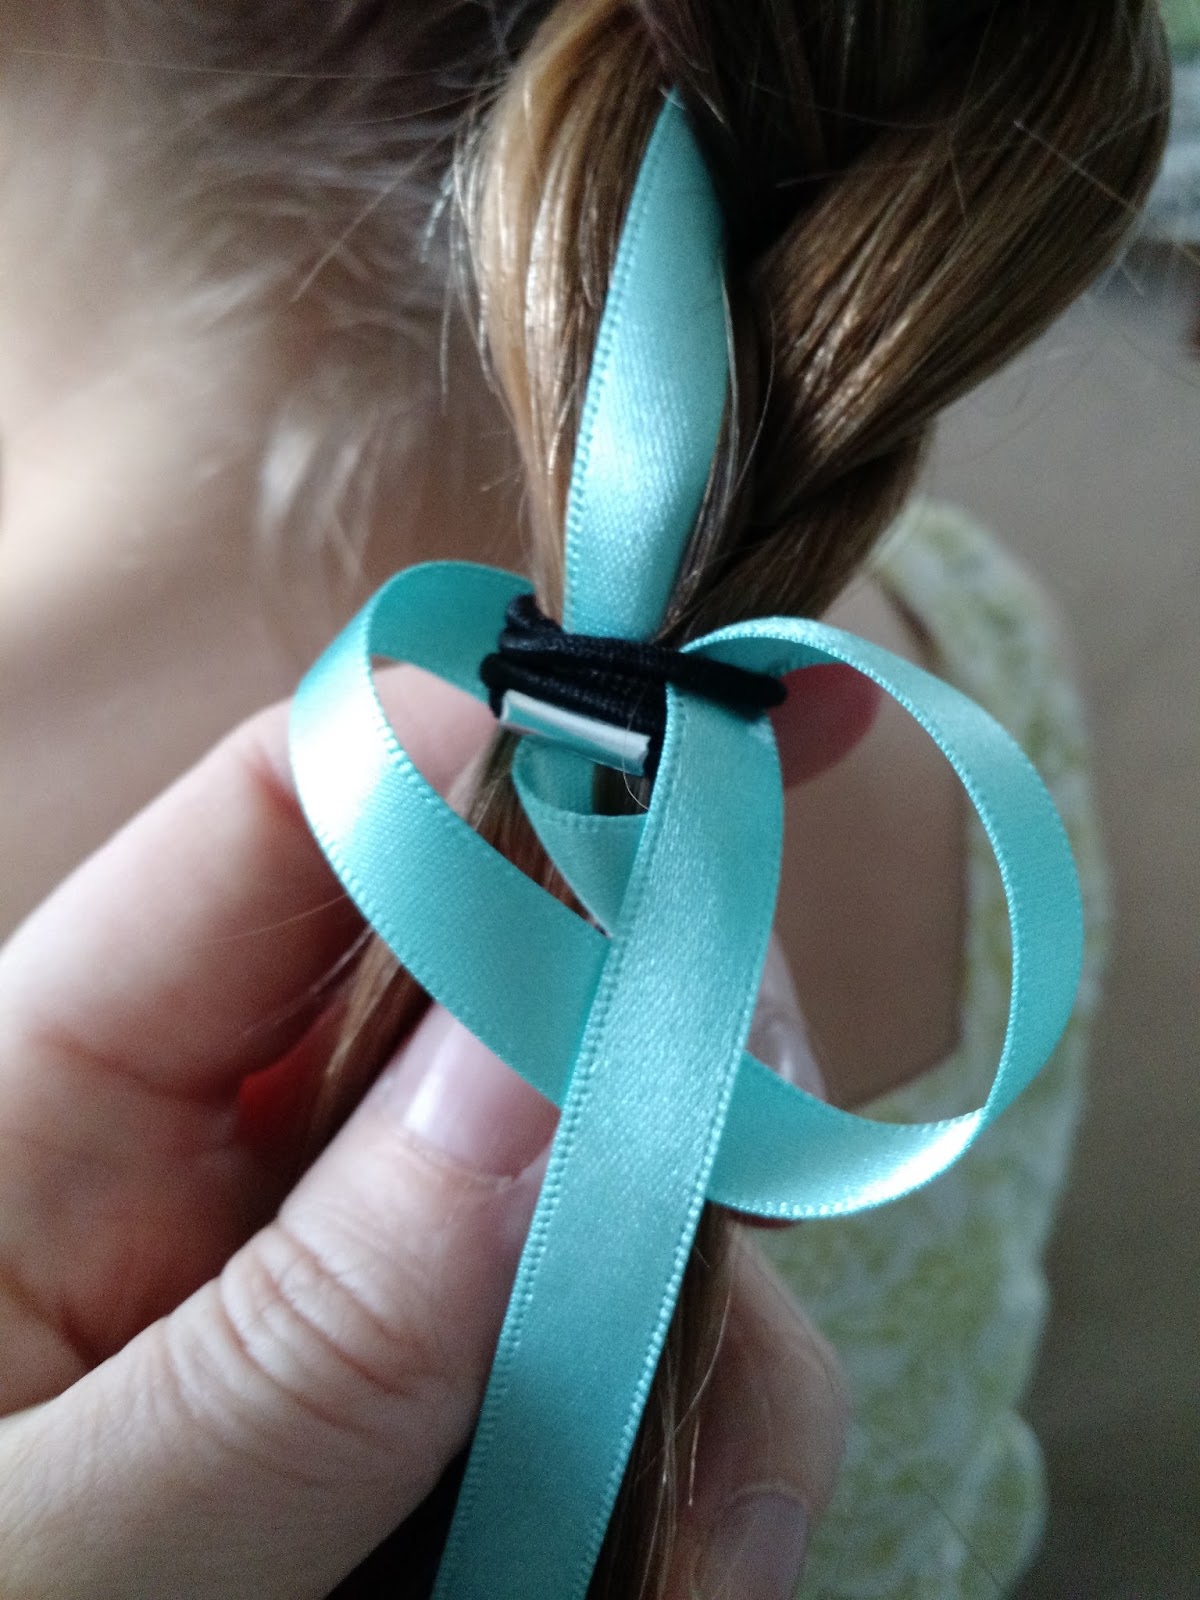
3. Take a long piece of ribbon, of whatever colour you choose. Shelley had turquoise in the story, but imagine a coral pink or a starfish gold or silver, or seaweedy green!

Secure it round the hair-bands that are holding the pony-tail.


4. Then wrap the long part around the ponytail to hide the knot and the bands, then loop through itself to stop it unravelling.


5. Now you can start your big plait, weaving in the ribbon with one of the three strands. You can keep the plaited section as short or long as you like. Then fasten with a hairband.


6. Then wrap the ribbon round the hair-band again and thread it through itself or the hairband to keep it in place. Then lead the ribbon down through the next section of hair and secure with a hairband again. I pulled the hair gently so that it spread out into a nice bulging bobble.


Repeat this stage again to create another bobble of hair, and keep going if you have ultra long hair, or just do one if you are running out of length. This is why the plait section may vary a lot too. 


7. After each section is tied off with a hairband and wrapped around with the ribbon, you can tie a wider ribbon at the bottom to finish it off in a nice bow. Leave a nice big tassel if you can.

Then you can enjoy swishing and flicking your plait behind you. 


If you have a go at Shelley's hair-do, please send us a photo of how it turned out. Or you might like to experiment and find your own way to tie up long hair.

If you have short hair, there are still lots of ways you can play with plaits and pony-tails, buns, twists and clips. Maybe you could find a way to slide in a shell or two, or some beads or stars! We'd love to see all your mermaidy hair-dos. Email them to:

susie@mermaidlegends.co.uk

and we will post them up in the gallery on the Mermaid Legends website.


A Mermaid Legends How-To: Make Nana's Seaweed Buns

 As some of you will know, I recently spent a year blogging about the making the yummy food within classic children's stories.

Now, a brand new story for children has been published, with my illustrations in. Estella and the Falling Star. And I couldn't resist trying to make the seaweed buns that young mermaid Merina enjoys eating at her Nana's house. 


The book describes them as seaweed buns, and I had to draw Nana carrying a plateful of them. I pictured them as a bit like scones. A nice soft doughy bun that I could imagine Nana patting out roughly, rather than rolling the dough and using a cutter.


For the dough, I use my favourite scone recipe, shared with me by a friend whose scones I  have admired and enjoyed at many lovely teatimes. I've added seaweed, cheese, herbs and spcies. Feel free to use your own scone recipe and tweak the extras if you like. 


Ingredients:

8oz self-raising flour
1 tsp baking powder 
1 1/2 oz soft butter
1/4 pint milk (you may not use all of this)
pepper (to your taste)
pinch salt
pinch or two or paprika
pinch of cayenne papper
big handful or two grated cheese (I used Parmesan, but cheddar will be fine.)
a generous sprinkling of dried oregano
a pinch of dried thyme
A big handful of seaweed (Make sure it's edible. I bought a packet of dried seaweed on ebay, because my supermarket was out of stock. Put it in a bowl of water for a few minutes until soft. Then squeeze out the water and use scissors to snip into little pieces.)

Place flour and baking powder in bowl.
Add butter and rub in to make a breadcrumb texture. Then add all the extras - salt and pepper, oregano, thyme, cheese and seaweed. Gradually add milk to make soft dough.

Squidge into a ball, without squeezing it too tight or handling it too long. Chuck onto lightly floured surface. Pull off evenly sized lumps, about the size of a plum, lightly roll in your palm to make a ball, place on a baking sheet lined with baking paper and press down to give it a flat top and bottom.


If you want to give it an extra Mermaid Legends feel, you could press the back of a ribbed shell into the top, before brushing them all with milk.
Bake at 220C for ten to twelve minutes.

Eat while just still warm if possible. They're really yummy with tomato chutney.


Thursday 22 October 2015

The Magic of Mermaids

Do you think there might be some way we can work together? said the amazing Amy Sparkes, one day, to the amazed Susie Tyler. 

Said the Susie Tyler, "You name it."


And this little unknowing mermaid was the trigger that set in motion an exciting cascade of suggestions, realisations, conversations and illustrations. 

All I knew at first was that Amy was keen on something fantastical. I started filling a sketchbook with dragons and fairies, and this one little mermaid. I always wanted to be a mermaid. At the swimming pool, my friends and I would slip into mermaid identities as our skin hit the water. Invisible dolphin friends would surround us and we would twirl happily through the water imagining oceanic surroundings and adventures.
Whilst drinking gallons of Lady Grey tea and drawing away, I took a snap of this mermaid and emailed it over to Amy to see if I was on the right track. It was at this point that Amy decided the world was ready to greet her cast of mermaids who inhabit Sapphire Seas. It was time for a new story to be launched. 


Estella and the Falling Star was ready and waiting for its illustrations, and now that it's really here, printed, and in my hands and on my bookshelf, I look back on the last few months as a happy, dreamy blur. Full of many many shells and tails and a LOT of hair!

I have adored finding the visual identity of Merina, Estella, Pippa, Shelley and Nana. I had to start by exploring lots of hairstyles. Although colour is very important for the front covers, we couldn't rely on the mermaids' colour differences to set them instantly apart from one another inside the book.
Being black and white, they needed to be complete individuals, with very differing hairstyles and clothing. Amy and I had a lot of fun (and a lot of tea - it just so happens we share a love of Lady Grey teas as well as mermaids) deciding what hair worked best for each character. Pippa has cropped hair which we felt echoed her cheeky nature and sharp wit. And it was nice to break with the tradition of long hair for one of the mermaids. 

Once they were all designed, I was delighted to re-read the latest draft of the story and find that Amy had slipped in a few extra adjectives to mention their lovely locks. The fun of hearing an author describe a character that you have visualised is almost too much!


Gradually the finished illustrations built up and we were able to go full steam ahead with the publication. And here it is. It is a book.